 Drop manual
The MP 2X and SP 40
Drop has two drum machines: the MP 2X and the SP 40. They work the same way and only look different, so everything in this manual applies to both. You can use them on the web or in the Chrome extension.
1Quick start
- Open the machine. Go to dropsampler.com → Play it now, or open Drop from the Chrome toolbar.
- Click anywhere on the machine. This turns on the keyboard, so your computer keys play the pads. Click outside the machine to type normally again.
- Hit some pads. Click them, or use the keys 1234, QWER, ASDF, ZXCV. They're laid out just like the pads.
- Press Play (P). A demo song is loaded the first time you open Drop. Stop is Space.
- Make your own. Press Rec (Enter), wait for the four-beat count-in, and play the pads. Your hits loop.
- Save it. Press SAVE (Y) and pick Project to keep the beat, or Bounce WAV for an audio file.
2The machine, part by part
Here's the MP 2X with its main parts numbered. The SP 40 has the same parts in the same jobs.
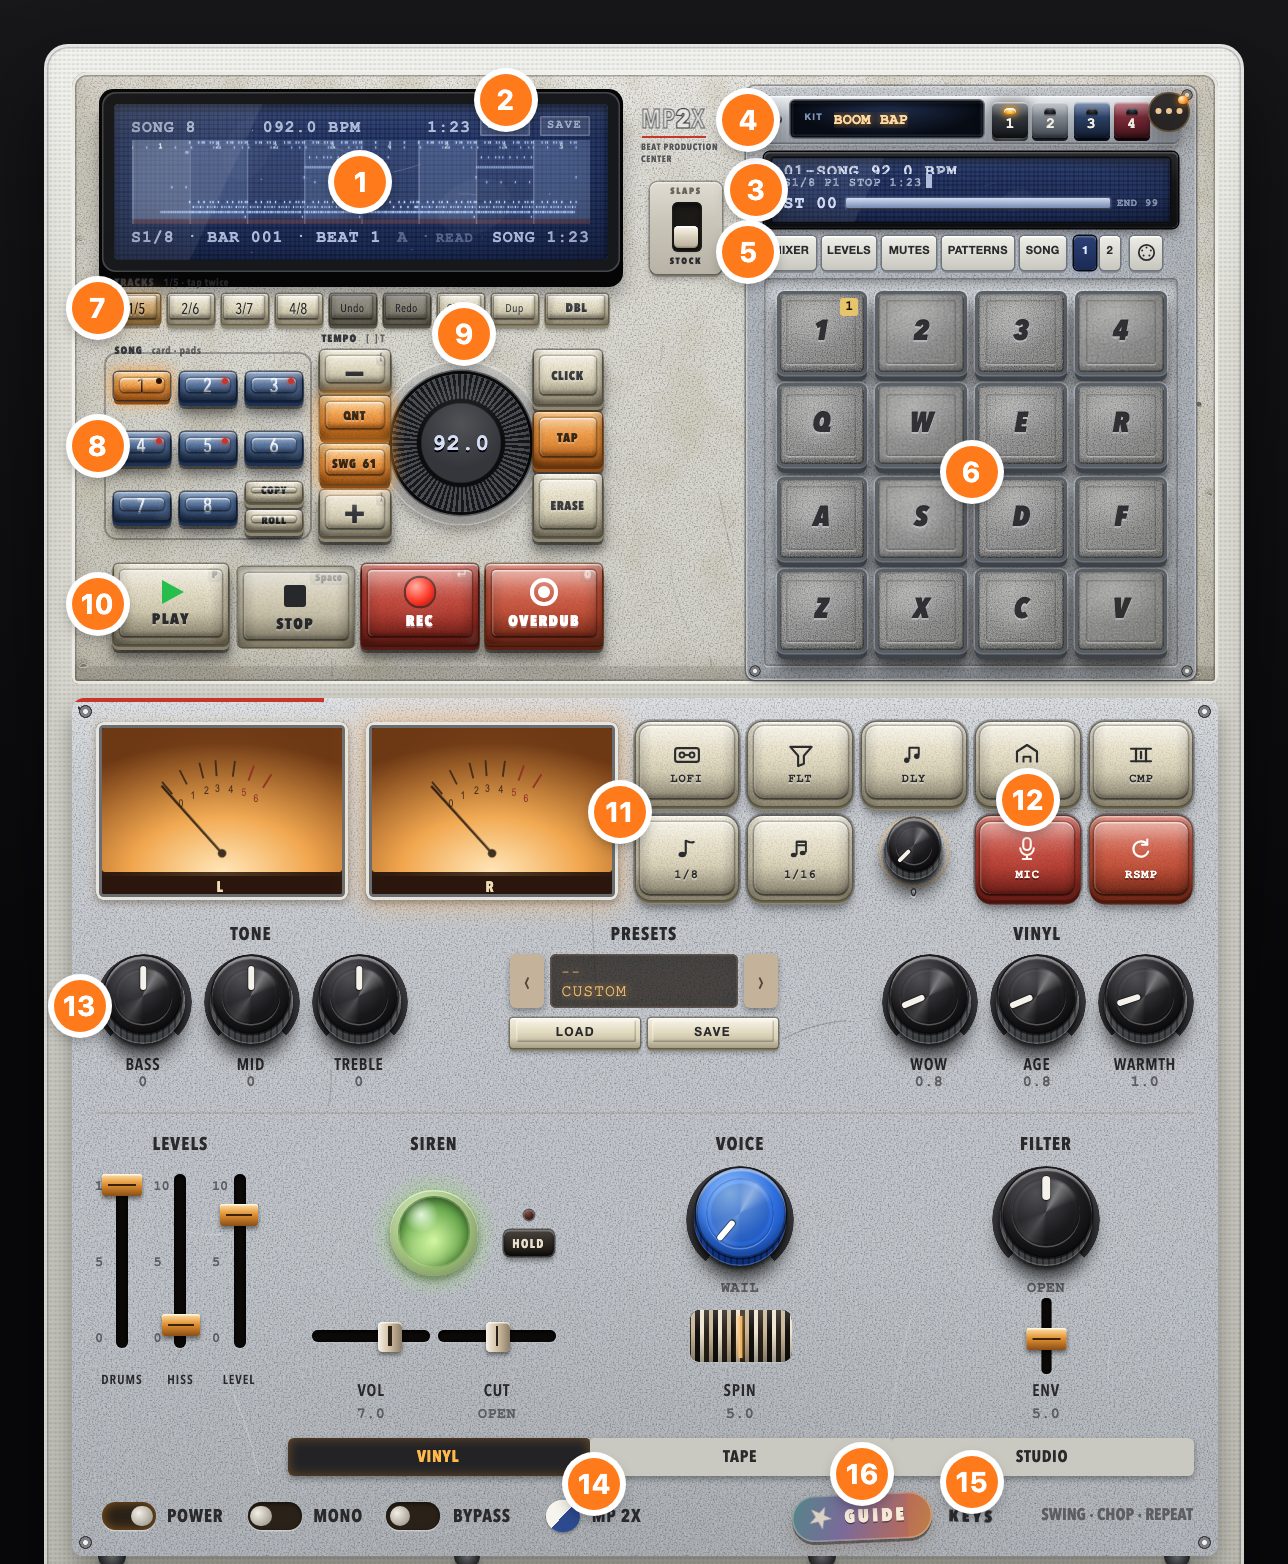
- 1Main screen. Song, tempo, bar and beat, and a picture of the pattern. Drag the braces to set the loop.
- 2LOAD and SAVE. Bring in sounds and beats, or save your work. More
- 3Pad screen. The last pad you hit, its sample, and messages. Click it to open the chop card. More
- 4Kits 1–4. Four drum kits, one per button. More
- 5Mixer row. Mixer, Levels, Mutes, Patterns, Song, and pad pages 1 and 2. More
- 6The 16 pads. Click, tap, or use the keys. More
- 7Track keys and edit keys. Tracks 1–8, Undo, Redo, Choke, Dup, Dbl. More
- 8Pattern keys 1–8. Pick a pattern. Copy and Roll sit beside them. More
- 9Tempo. Turn the wheel or use − and +. Also Click, Qnt (quantize), Swg (swing), Tap, and Erase.
- 10Transport. Play, Stop, Rec, Overdub.
- 11Effect keys. Lo-fi and four pad effects, then 1/8, 1/16 and the stutter knob. More
- 12Mic and Rsmp. Sample your mic, or record the machine itself onto a pad. More
- 13Room controls. Tone, vinyl, levels, siren and filter for the whole sound. More
- 14Machine switch. Swap between the MP 2X and the SP 40.
- 15Keys. Shows every keyboard shortcut. More
- 16Guide. A short guided tour on the machine.
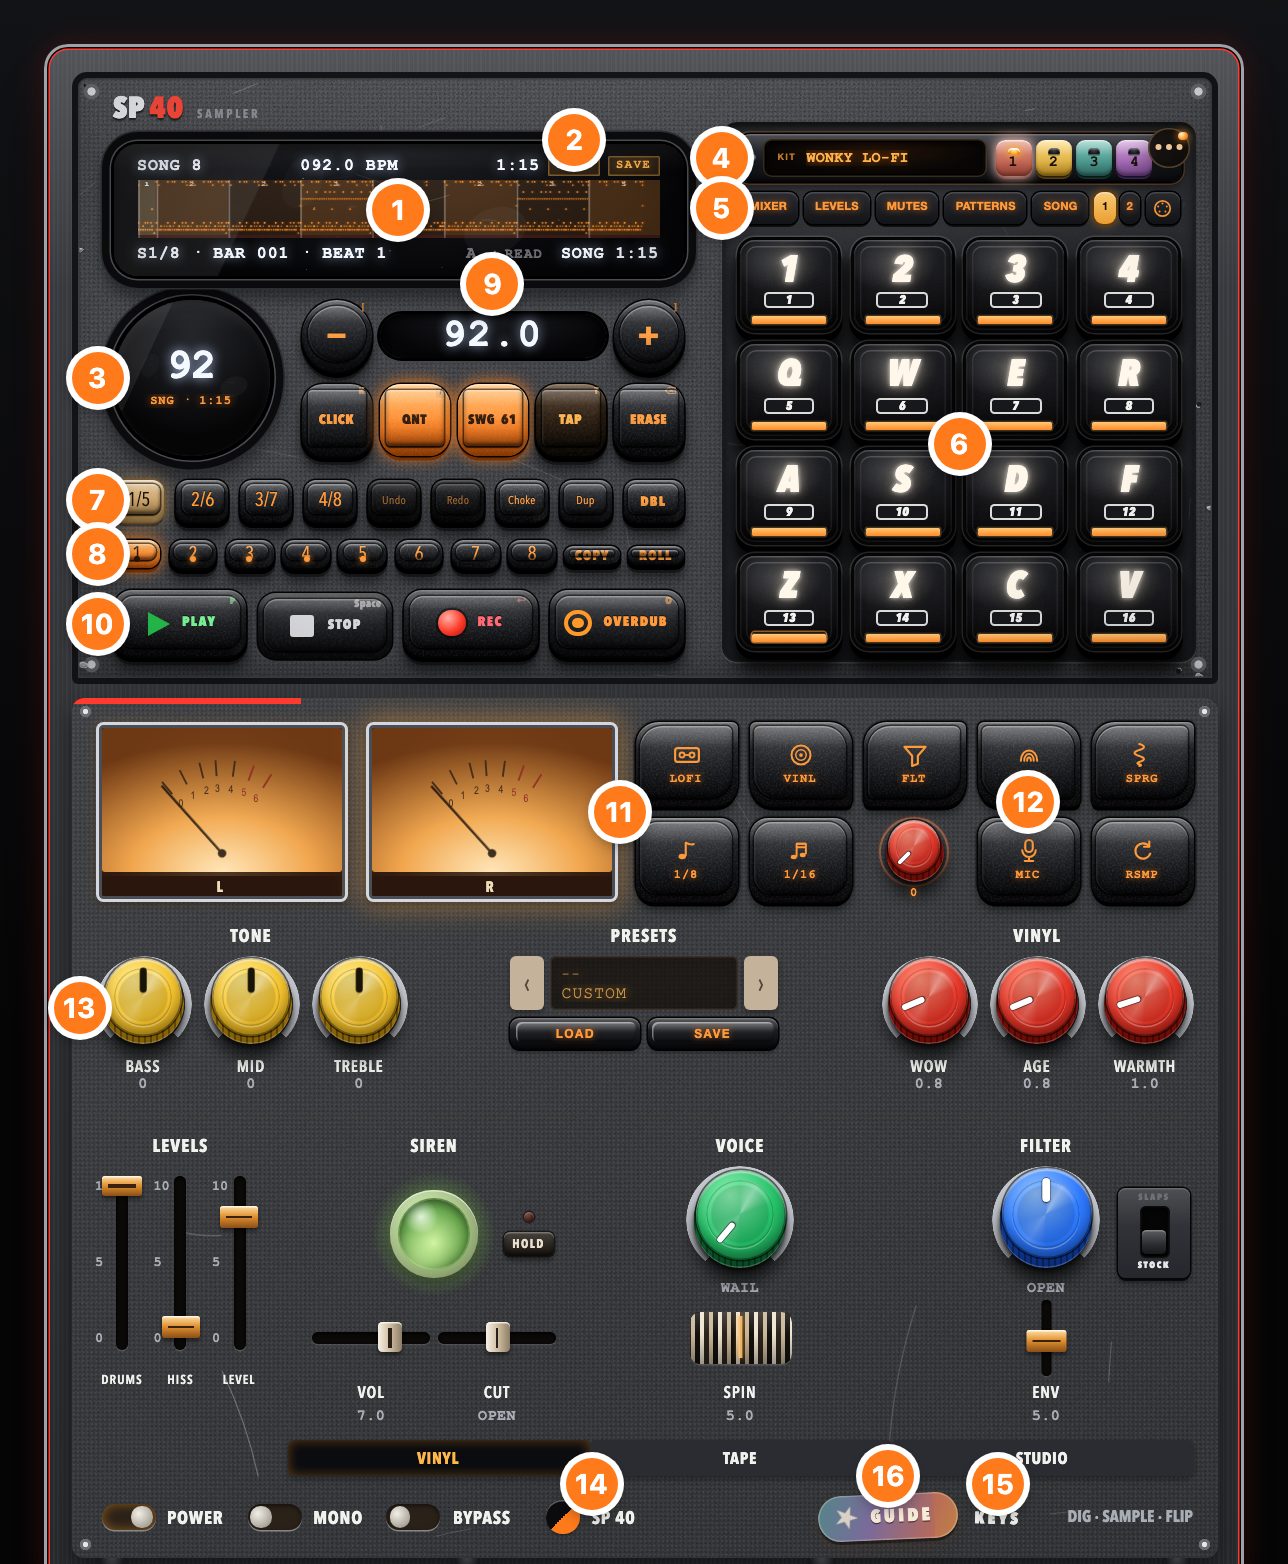
The SP 40
Same parts, same numbers, different look. Switch with the machine switch (14), or type S then P for the SP 40 and M then P for the MP 2X. Two real differences:
- Each SP 40 pad has a small start slider under its number, so you can set where a sample starts without opening the chop card.
- The pad effects differ. The MP 2X has Filter, Delay, Reverb, Comp. The SP 40 has Vinyl, Filter, Echo, Spring.
3Play the pads
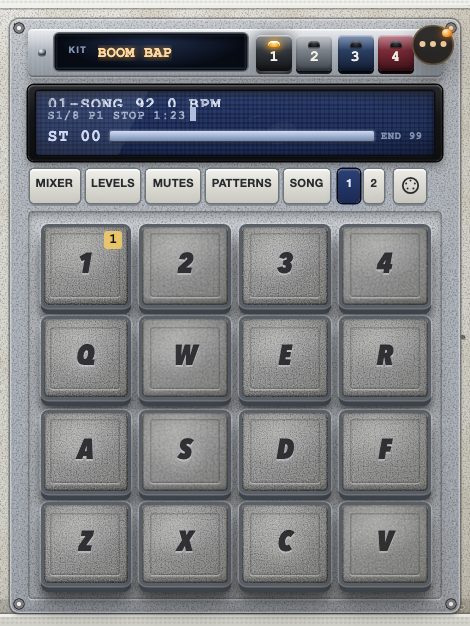
- Click or tap a pad. A hit nearer the middle plays a little louder.
- Keyboard: the four rows of keys match the four rows of pads. Click the machine first.
- MIDI keyboard or pad controller: plug it in and play. C1 is the bottom-left pad, then across and up. The notes after the 16 pads play page 2, and after those come the sirens.
- Kits: buttons 1–4 above the pads pick a kit, or press J for the next one. Each track remembers its own kit.
- Page 2: buttons 1 and 2 at the end of the mixer row switch pad pages. Page 2 is 16 more pads for your own samples and resamples.
- Stop everything ringing: hold Choke, press 5, or tap Stop twice.
4Load sounds
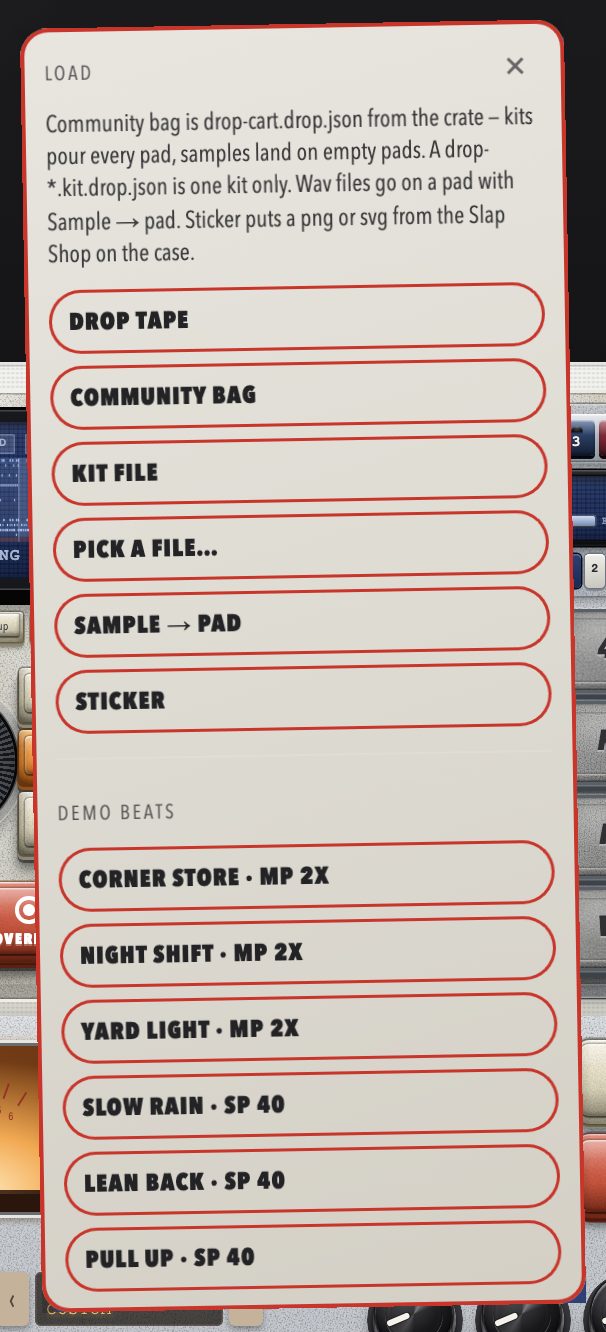
Press LOAD (U) at the top of the main screen. The card offers:
| Option | What it does |
|---|---|
| Drop tape | Opens a saved beat (.drop.json): every pattern, kit and sample, exactly as it was. |
| Community bag | Opens a bag from the community. Its kits fill whole kit slots, and its samples land on empty pads. |
| Kit file | Loads one kit (.kit.drop.json). |
| Pick a file… | Opens any of the above, or an audio file. |
| Sample → pad | Pick an audio file (WAV, MP3, M4A, AIFF, FLAC…), then tap the pad it should go on. |
| Sticker | Puts a PNG or SVG sticker on the machine's case. |
| Demo beats | Six songs made on Drop. Open one to see how it was built. |
Faster ways to get a sample on a pad
- Drag and drop an audio file straight onto a pad.
- Right-click a pad to pick a file for it. Right-click a pad that has your sample to clear it.
- Mic: press MIC, tap a pad, make your sound, then tap the same pad again to keep it. You don't hear the mic while it records, so it can't feed back. Shift-click MIC if you want to hear it, with headphones on.
- Rsmp (resample): records the machine itself onto a pad, effects and all. Press RSMP (I) and tap a pad; it glows orange and waits. Play a pad or start a pattern and recording begins (the glow turns red). Tap the pad or RSMP again to finish. Up to about 32 seconds.
5Shape a sound: the chop card
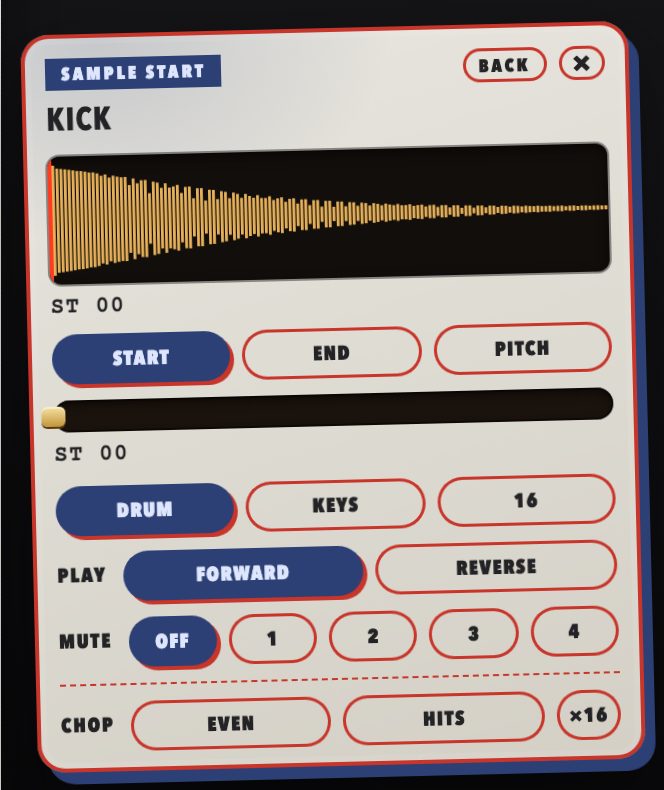
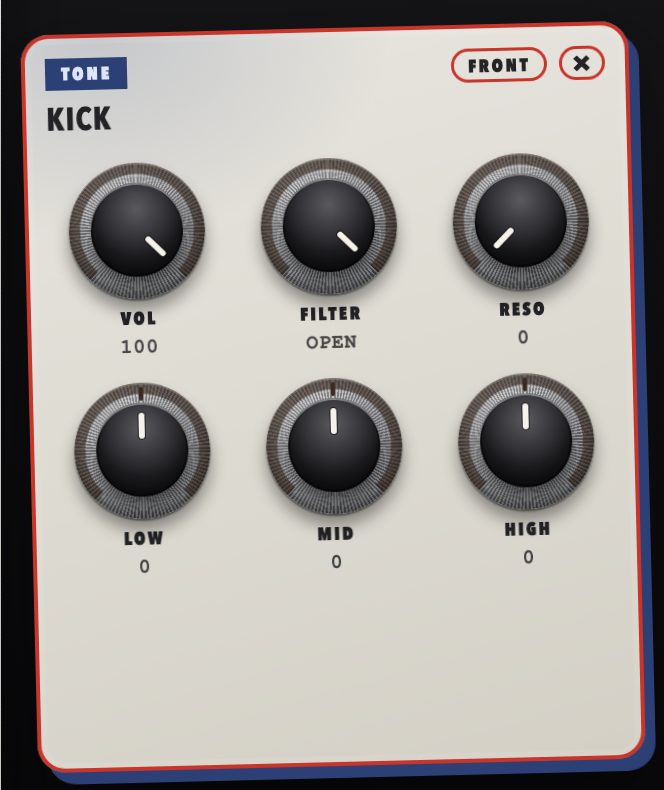
Hit a pad, then click the pad screen (or press Shift+S). The chop card opens for that pad. It has two sides.
Front
| Control | What it does |
|---|---|
| Start · End · Pitch | Pick one, then drag the bar. Start skips into the sound. End cuts it short. Pitch slows it down (lower and longer) or speeds it up (higher and shorter), like a record at the wrong speed. Hold Shift to drag finely; double-click to reset. |
| Drum · Keys · 16 | Drum plays the sound once. Keys turns all 16 pads into notes of this sound, lowest on the bottom-left pad. 16 puts the same sound on every pad, quiet at the bottom left and loud at the top right. |
| Voices · Octave | In Keys mode: Poly lets notes ring together, Mono cuts the last one. Octave − and + (or ↑ ↓) moves the notes up or down. |
| Play | Forward or Reverse. |
| Mute 1–4 | Pads in the same mute group cut each other off, like an open and a closed hi-hat. |
| Chop | Slices one sample across the pads. Even makes equal slices; Hits cuts at each drum hit. ×16 fills the page, ×8 the bottom two rows. Undo puts the pads back. |
Back
Press Back to turn the card over: Vol, Filter, Reso, Low, Mid, High for this pad only. In Keys mode a third row appears (Glide, Decay and Vibrato in Mono; Chorus, Detune and Attack in Poly). Drag a knob up to turn it up; double-click to reset.
6Effects
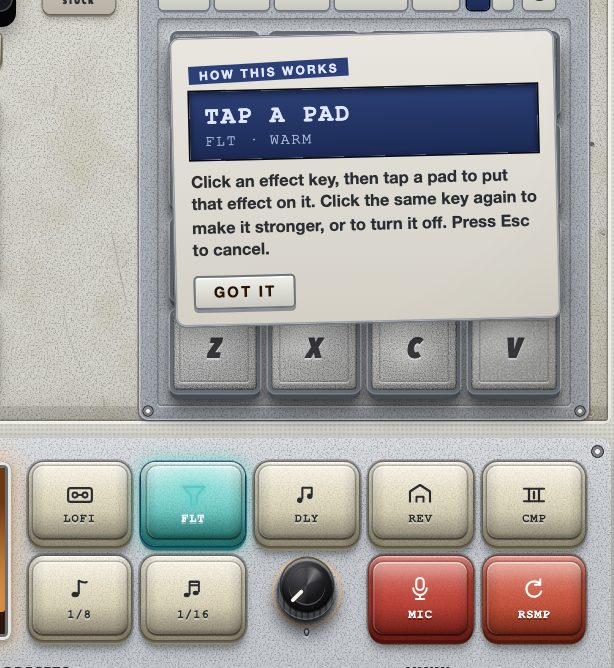
Pad effects
- Click an effect key (or Lo-fi).
- Tap the pad you want it on.
- Click the same key again for a stronger setting. There are three, shown as dots on the pad. A fourth click turns it off.
Lo-fi is also B. The four effects are L M G H. Esc cancels.
Stutter
1/8, 1/16 and the knob beside them repeat the whole beat in short bursts while it plays. Tap again, or turn the knob to 0, to let the beat back in.
7Record a beat
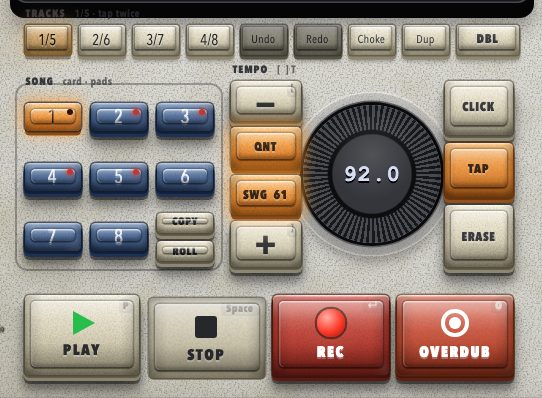
Tracks
Each pattern has 8 tracks, so you can record drums, bass and chords separately. The four keys 1/5, 2/6, 3/7, 4/8 pick them: tap once for tracks 1–4, tap the same key again for tracks 5–8. The color tells you which you're on. Recording, overdubbing and erasing only touch the active track.
Recording
- Pick a track.
- Press Rec (Enter). On an empty pattern it counts in four beats, then records from the top. If the track already has hits, it records over the loop straight away.
- Play the pads. Press Overdub (O) to add more on later passes.
- Press Stop (Space). Undo (⌘+Z) takes back the last change.
Timing
| Control | What it does |
|---|---|
| Tempo | Turn the wheel, press − / + ([ ]), or tap Tap (T) in time. |
| Click | The metronome (K). |
| Qnt | Quantize (/). On, hits snap to the 16th notes; off, your timing stays as played. Turning it back on snaps a loose take. |
| Swg | Swing, 50–75%: pushes every other 16th late. 50 is straight, 54–58 is a lazy nod, 66 is a full shuffle. |
| Bars | Pattern length, shared by all tracks: - and =, or click the bars readout on the main screen. |
| Erase | Clears the active track on this pattern (⌫). |
Patterns
- The blue 1–8 keys pick a pattern (, and . step through them; Shift+1–8 jumps).
- Dup copies this pattern to the next one. Dbl doubles its length (2 bars becomes 4).
- Copy, then a pattern key, copies this pattern there. Copy, then two pads, copies a pad's sound, effects and level to another pad.
A on the main screen controls recorded knob moves: Read plays them back, Write records new ones, Off ignores them.
8Edit in the roll
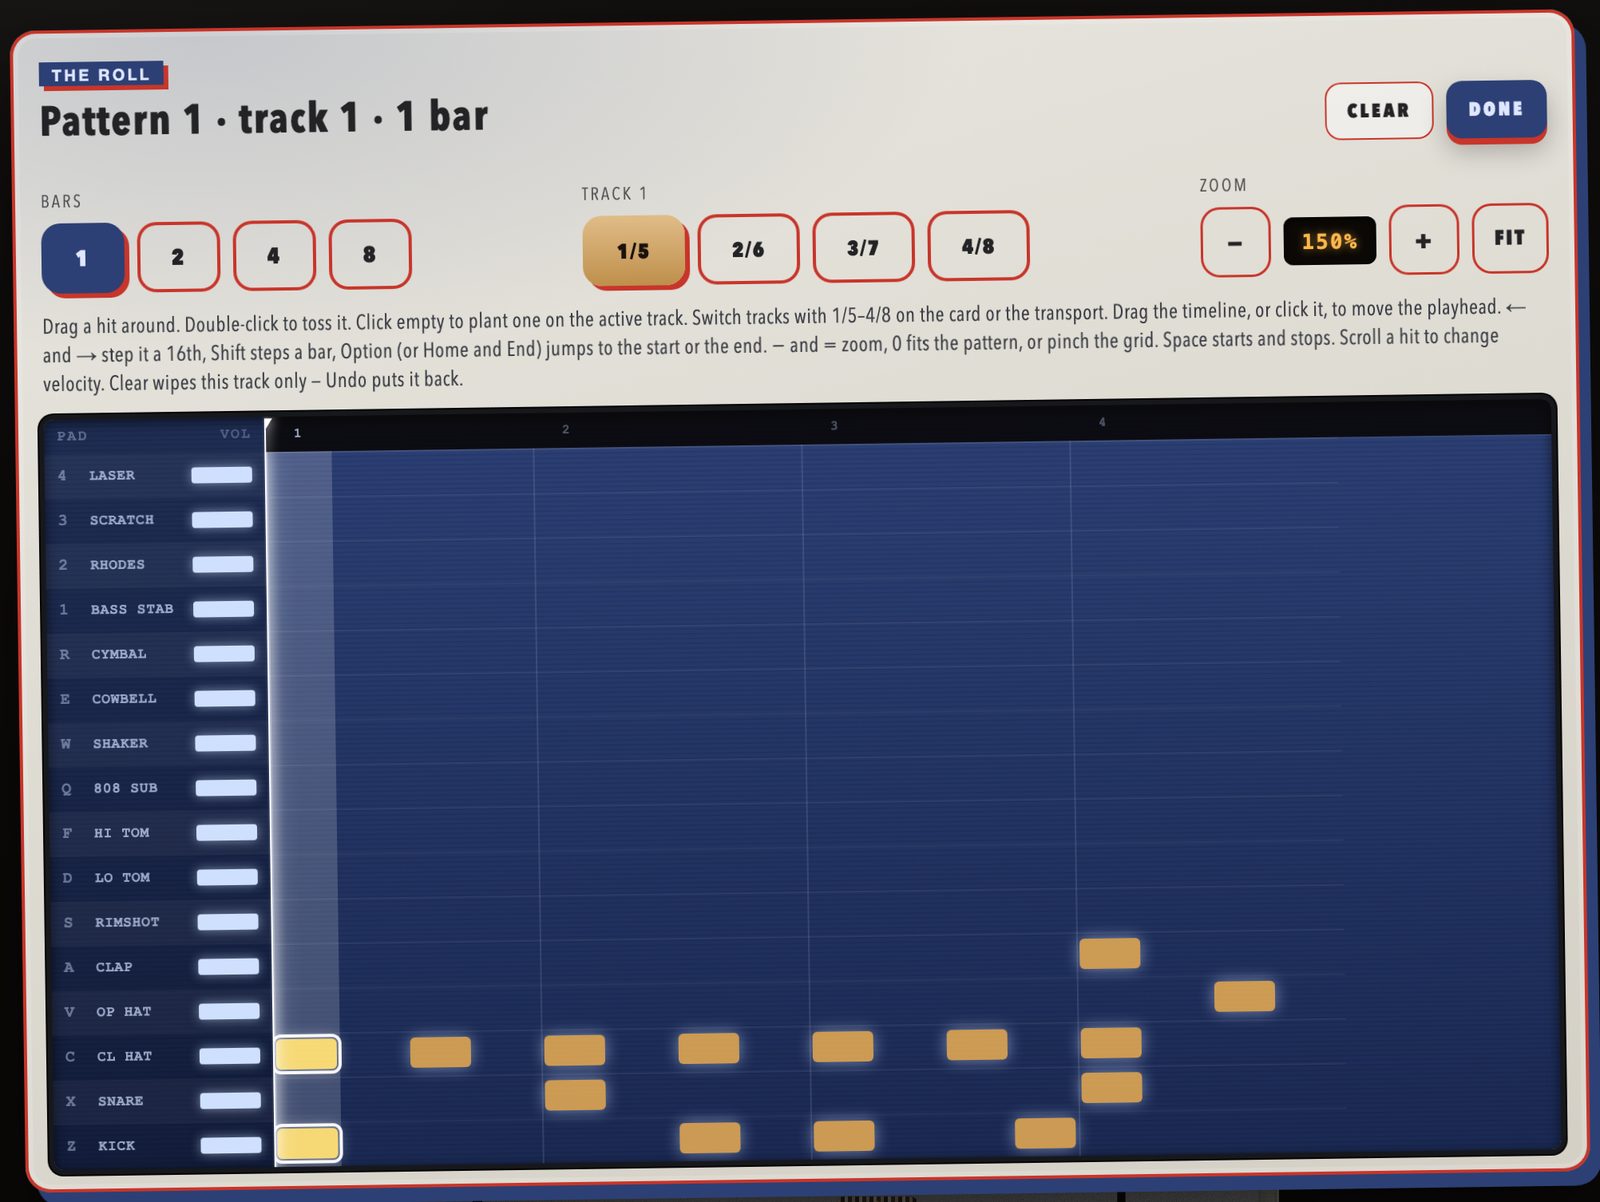
Press Roll (next to Copy), or double-click the main screen. The roll shows the active track.
- Add a hit: click an empty spot. Remove one: double-click it. Move one: drag it.
- Loudness: scroll over a hit.
- Bars 1 / 2 / 4 / 8 sets the length. 1/5–4/8 switches tracks.
- Zoom: − and +, or Fit to see the whole pattern.
- Clear wipes this track only. Undo brings it back.
- Space plays and stops while the roll is open. ← → step the playhead; add Shift to step a bar.
9The mixer
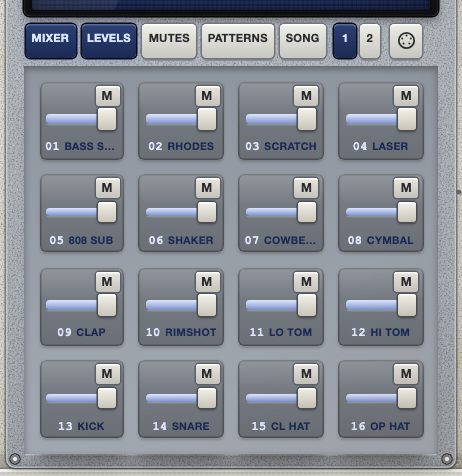
The mixer lives in the pad area. Use the row above the pads, or press ;.
| Button | What it shows |
|---|---|
| Levels | A volume fader per pad. Tap Levels again for track volumes (tracks 1–8). |
| Mutes | Mute pads. Tap again to mute whole tracks. |
| Patterns | The 16 pads become pattern keys, handy while performing. |
| Song | Opens the song arranger. More |
Esc puts the pads back.
10Make a song
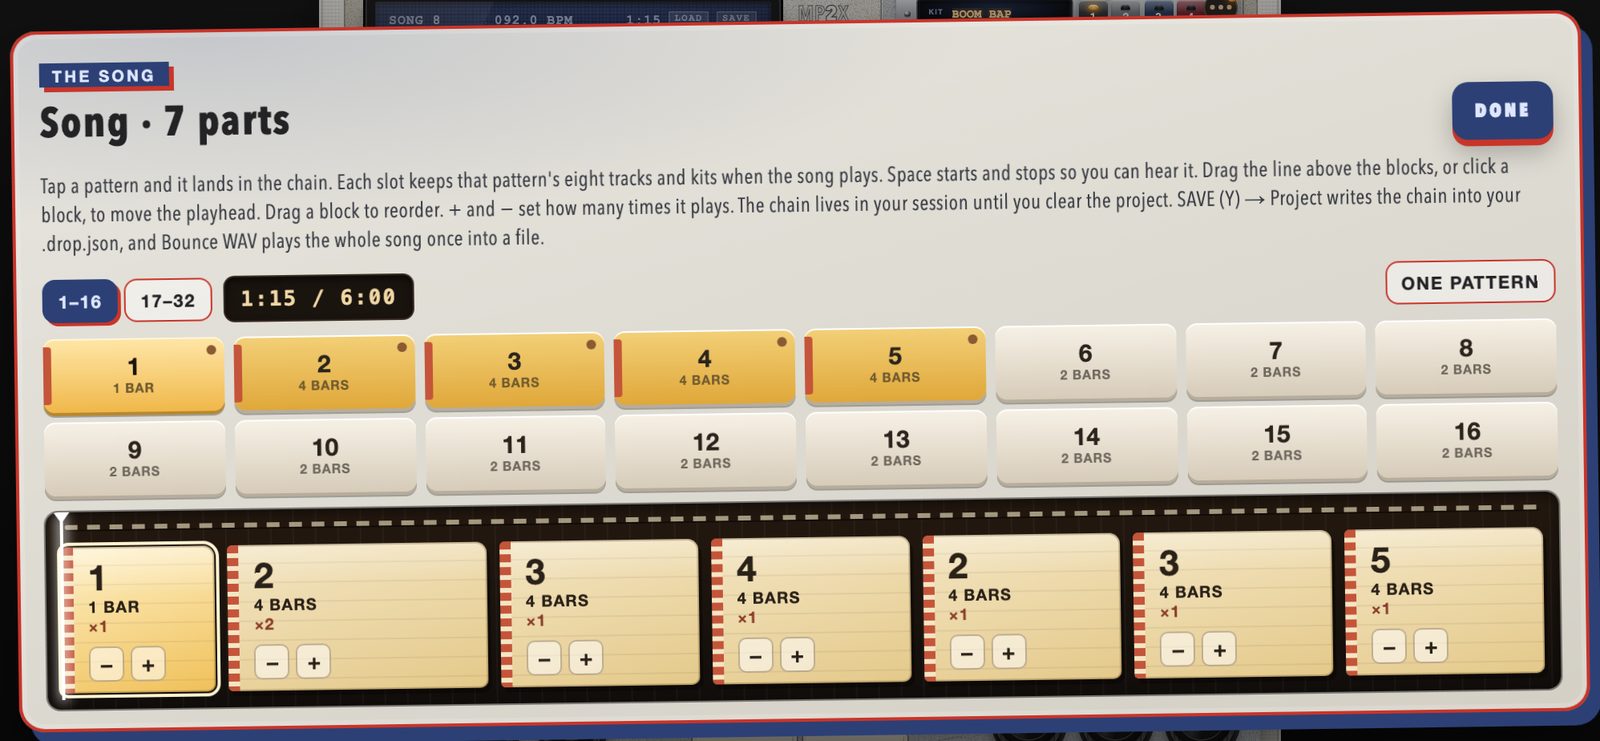
- Press Song on the mixer row.
- Tap patterns in the order you want; each one joins the chain at the bottom.
- Use − and + on a block to repeat it. Drag blocks to reorder.
- Space plays the song. Click a block to listen from there.
- Press Done. Song mode stays on; One pattern goes back to looping a single pattern.
Each part plays with its own tracks, kits and mix. A song can run up to about six minutes. Saving a Project keeps the song.
11Save and share
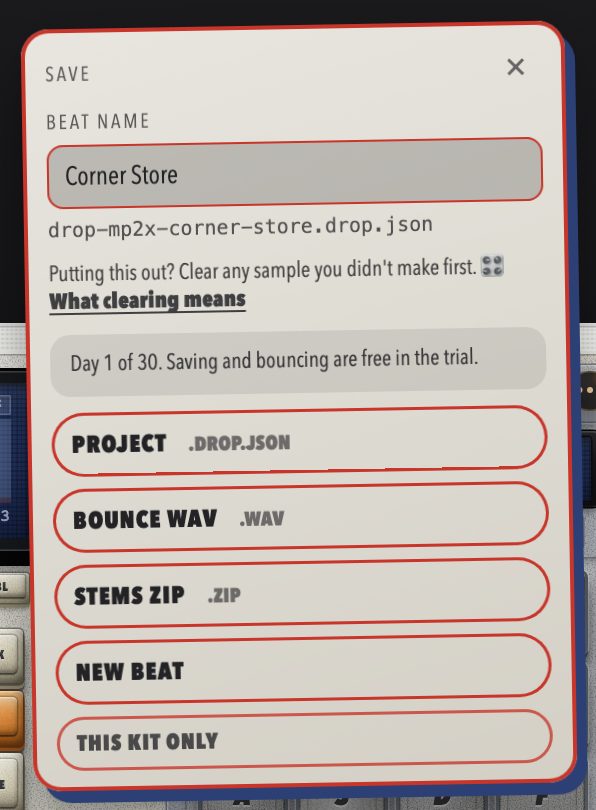
Press SAVE (Y). Name the beat at the top; every file uses that name.
| Option | You get |
|---|---|
| Project | A .drop.json file with everything: patterns, song, tracks, kits, effects and your samples. LOAD opens it again. |
| Bounce WAV | An audio file of the loop, or of the whole song in song mode. |
| Stems zip | The WAV plus one dry WAV per pad, all lined up, for mixing in another music program. |
| New beat | Clears the machine. If you have unsaved changes, it asks first. |
| This kit only | The pads of the current kit, as a .kit.drop.json. |
Share a beat in the community
- Save your beat as a Project.
- Open the community Beats page.
- Open Drop a beat, drop your
.drop.jsonin, add a title, a note and the machine, then press Put it in the crate.
Anyone can then Spin it (listen), Take tape (load it into their machine), or Share it. If your beat uses someone else's recording, read what clearing means before you release it.
12The room controls
The lower half of the machine shapes everything you hear, drums included.
13Keyboard shortcuts
Click the machine first so the keyboard is on. On Windows, use Ctrl for ⌘ and Alt for Opt.
| Keys | Does |
|---|---|
| 1–4 Q–R A–F Z–V | Play the pads |
| P · Space | Play · Stop |
| Enter · O | Record · Overdub |
| ⌫ | Erase the active track |
| ⌘Z · ⌘⇧Z | Undo · Redo |
| T · [ ] | Tap tempo · tempo down / up |
| K · / | Click · Quantize |
| - = | Fewer / more bars |
| , . · ⇧1–8 | Previous / next pattern · jump to a pattern |
| N · ⇧N | Copy pattern or pad · double the pattern |
| J | Next kit |
| ⇧S | Open the chop card |
| ↑ ↓ | Octave in Keys mode, or change the knob a key grabbed |
| B · L M G H | Lo-fi · the four pad effects |
| I | Resample |
| 5 | Choke (silence everything ringing) |
| ; | Mixer |
| U · Y | LOAD · SAVE |
| M P · S P | Switch to the MP 2X · the SP 40 |
| Esc | Cancel, close a card |
| ? | Guided tour |
14Words Drop uses
| Word | Means |
|---|---|
| Tape | A saved beat, the .drop.json file from SAVE → Project. |
| Kit | A set of 16 sounds. Each machine has four kit slots. |
| Bag | A community download with kits and samples together. |
| Crate | The community's shelf of beats. |
| Resample | Recording the machine's own output onto a pad (Rsmp). |
| Bounce | Turning your beat into an audio file (WAV). |
| Stems | One audio file per pad, lined up, for mixing elsewhere. |
| Slaps | Stickers on the machine's case. The Slaps switch shows or hides them. |
15If something's wrong
| Problem | Try this |
|---|---|
| No sound | Click the machine once (browsers wait for a click before playing audio). Check Power is on and the Drums and Level faders are up. |
| Keys don't play pads | Click the machine. Clicking outside it turns the keyboard off so you can type elsewhere. |
| MIC does nothing | Allow the microphone when your browser asks. If you said no, change it in the site settings (the icon left of the address bar). |
| MIDI device not found | Plug it in before opening Drop, or reload. Allow MIDI if your browser asks. |
| Where did my file go? | Projects, WAVs and stems go to your Downloads folder. Open a project with LOAD → Drop tape. |
| I can't save anymore | Your 30-day trial has ended. Playing still works; $12.99 once unlocks saving and bouncing for good. |
Still stuck? Ask in the community Talk board or email azwareadmin@gmail.com.